
Reprinted with Permission - Original blog article by Al Borrelli

This awesome post (more like gathering of suggestions!) is going to help all you parents (often stay at home ones) be better photographers with the limited kit and time at your disposal. This is NOT about achieving professional results, but of making the most out of simple techniques and basic kit.
This is all about the thought process without you needing to know much more than how to put your camera in Aperture Priority mode and think about basic photography principles. At the very least you will now know YOU can do this without actually having to be me.
There are 120+ images in THIS FLICKR SET to which this tutorial makes reference, feel free to use these for inspiration (that doesn’t mean any stealing of them!). Obviously, none of these are ‘perfect’ but I’d like to think none of them are simply snap shots either.
What you need: Virtually all of these photos were taken with available light only and either a 50mm 1.8 or 24-70mm 2.8 lens. The key to 90% of these images is a wide Aperture, interesting Composition and good use of Light. A small selection were either artificially lit (ie a lamp) or flashed (only last 3).
Let’s start with Composition, and this should apply to ALL images regardless of the rest of the below topics. Get lower. Get higher. Do anything to change the photo from being a “I’m standing here with camera at eye level shooting my kid” boring photo.
No matter how cute your kid is, if you get boring with composition, it’ll be boring to anyone but you and your family, I promise. Getting lower is one of the better techniques with kids. Tight crops work great, but so do very wide environmental shots emphasizing how small (and cute) they are! And get details (like hands, or feet like THIS one)!
The below first example is taken straight out of camera with no post-processing, I’m using it to illustrate changing perspective even though it has a pretty standard centered composition. But I’d like to believe centered works here due to the different/interesting perspective and use of DoF.
Now let’s focus on Aperture (first 11 images in the link) which I do in almost all my baby shots. I shoot at the widest aperture possible (smallest f/number). This accomplishes two things I think are crucial to baby shots:
1. Speed. Allows for fastest possible shutter speed under often difficult lighting conditions as many of you will be indoors at home. This lets you actually capture those fast moving monkeys!
2. Shallow depth of field. Allows for that nice soft blurry background feel to the photos and blurs those busy/ugly backgrounds.
Just make sure you nail the focus on the eyes!

Great use of available light (next 17 images)
By “available” I mean ambient light from windows. Learn to expose for your subject which often softly blows out the background when you’re indoors. It also often allows for nice soft back/side lighting as your child will often be darker than the light coming in.
By “available” I mean ambient light from windows. Learn to expose for your subject which often softly blows out the background when you’re indoors. It also often allows for nice soft back/side lighting as your child will often be darker than the light coming in.
Also, large windows make for great soft lighting especially if you have a thin/sheer curtain in front of it. Just put some thought into how you’re positioned relative to the light so that you get good catch lights, or as mentioned so that it’s a great back/side/rim light.
This was shot with only window light.. granted, a big window, hence the soft light.

Artificial lighting (next 14 images)
By this I mean your readily available lamps/household lights. Due to poor light where I live, I’ve often used our “day light” simulator which is quite bright, but any light will do. You just have to be aware of two things:
By this I mean your readily available lamps/household lights. Due to poor light where I live, I’ve often used our “day light” simulator which is quite bright, but any light will do. You just have to be aware of two things:
White Balance: Either pre-set it in-camera or fix it later in post-processing, but many of your images will turn out yellow/orangeish due to the nature of household lighting.
Slow shutter speeds- because these light sources tend to be weak, you’ll have to ensure you have as wide an aperture as possible and probably have to bump up your ISO quite a bit. Don’t be afraid of high ISO as you can use noise-removing software that often give that “soft” feeling that works well with baby shots.
Timer portraits (next three)
You need a tripod (I used a large GorillaPod), but even propping it on your purse/bag will work. Set the camera up, take some test shots to check exposure then grab your baby and have some fun! This example has my gorilla pod clinging to a tree!
You need a tripod (I used a large GorillaPod), but even propping it on your purse/bag will work. Set the camera up, take some test shots to check exposure then grab your baby and have some fun! This example has my gorilla pod clinging to a tree!
Set it up (next 12)
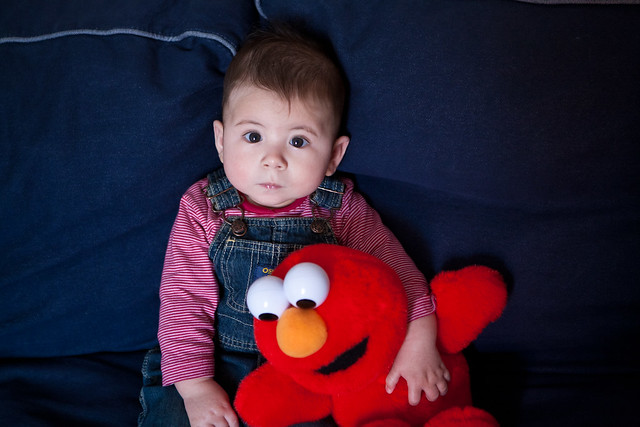
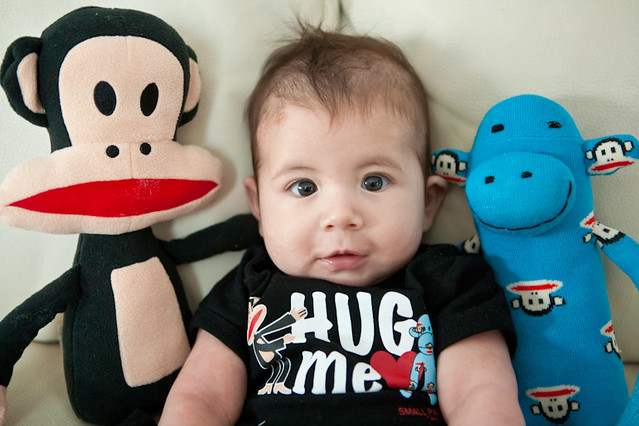
There’s nothing wrong with setting it up. Not all shots have to be purely beautiful captures. Sometimes you set the scene and still get great candids. Get those plush toys that mean something to your Monkey. Put them in cute clothing.
There’s nothing wrong with setting it up. Not all shots have to be purely beautiful captures. Sometimes you set the scene and still get great candids. Get those plush toys that mean something to your Monkey. Put them in cute clothing.
Include the environment (next 11)
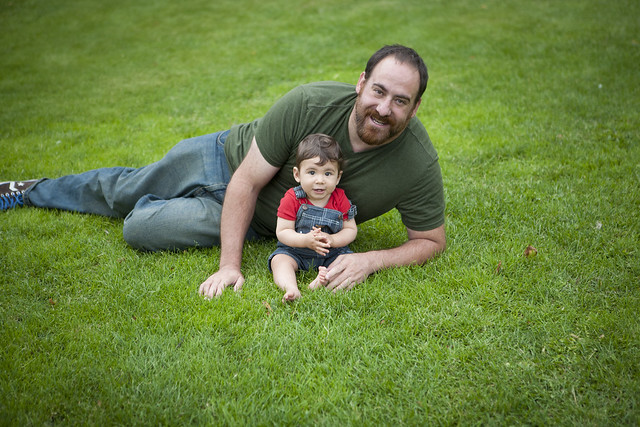
This helps with putting the size and cuteness of your Monkey into perspective, especially if outdoors. Yeah, it’s nice to have a bunch of close-ups of his adorable face, but don’t you also want to know where he was at the time of that great photo? Back up… don’t worry they’re slow.
This helps with putting the size and cuteness of your Monkey into perspective, especially if outdoors. Yeah, it’s nice to have a bunch of close-ups of his adorable face, but don’t you also want to know where he was at the time of that great photo? Back up… don’t worry they’re slow.

Catch that moment (next 15)
This is kind of obvious.. capture those awesome moments! “No @#$%, Captain Obvious” you’re saying right now. But what separates your awesome moment from mine.. I’m proactive instead of reactive. Assume something great is going to happen. Know your child.. know that every time you do X he does Y and be ready for it. Then, when combined with creative aperture use, good use of light and thoughts on composition, you’re now moving beyond cute snap shot, to great candid capture!
This is kind of obvious.. capture those awesome moments! “No @#$%, Captain Obvious” you’re saying right now. But what separates your awesome moment from mine.. I’m proactive instead of reactive. Assume something great is going to happen. Know your child.. know that every time you do X he does Y and be ready for it. Then, when combined with creative aperture use, good use of light and thoughts on composition, you’re now moving beyond cute snap shot, to great candid capture!
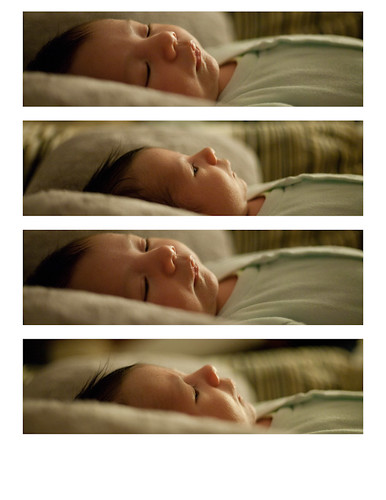
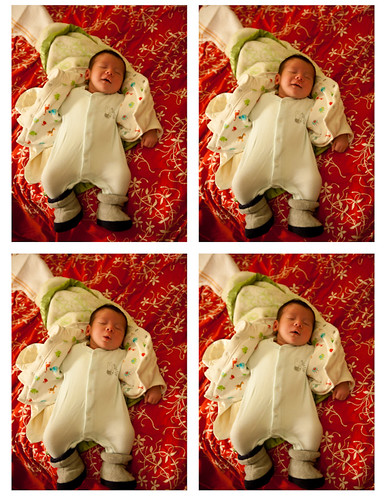
Creative post-processing (next 6)
So, you’ve taken 350 photos in a 5 minute cute-fest of your little Monkey being awesome. Many of them are great shots and you just can’t pick 1-3 to post on Facebook without annoying all your friends with all those damn baby pics… so get creative! Put 3-6 on each image. Merge them together, put them in sequence.. have fun with it!
So, you’ve taken 350 photos in a 5 minute cute-fest of your little Monkey being awesome. Many of them are great shots and you just can’t pick 1-3 to post on Facebook without annoying all your friends with all those damn baby pics… so get creative! Put 3-6 on each image. Merge them together, put them in sequence.. have fun with it!
These two versions were done using the “Print” module in Lightroom from which I “printed to file” and saved as a jpeg. Easy peasey (if you have LR of course!).
Proper flashing (last 3)
And lastly, proper use of flash.. this one requires proper knowledge of flash and of your camera settings, but honestly, it can also be quite simple. The last three images from the set (and the ones below) were shot with a canon 430ex flash shot through a cheap umbrella and was triggered with a radio trigger bought (cheaply) from GadgetInfinity.com. The black background was a black sheet. That’s it. You can get this type of lighting set up for less than 100$.. but you still need the know how. But I promise, with a bit of effort and reading, you too can do it!
And lastly, proper use of flash.. this one requires proper knowledge of flash and of your camera settings, but honestly, it can also be quite simple. The last three images from the set (and the ones below) were shot with a canon 430ex flash shot through a cheap umbrella and was triggered with a radio trigger bought (cheaply) from GadgetInfinity.com. The black background was a black sheet. That’s it. You can get this type of lighting set up for less than 100$.. but you still need the know how. But I promise, with a bit of effort and reading, you too can do it!
Next time I’d have the light pointed more in his face (it was off to the side) so that there’s more light in his eyes.. still, very happy with this basic easy set-up.


Disclaimer: All of my image have some minimal post-processing done in Lightroom. Was it necessary? No. Did it help? Yes, a great deal. But that’s not saying you can’t follow the above suggestions without doing any post-processing and not get great shots.. Lightroom only makes good/great shots better, it won’t save your crappy snapshot, sorry!
Now get out there with some/all of these suggestions in mind and start turning those snapshots into something more.
Thanks for the kind words Rich!
ReplyDeleteAl